As a Website or Business owner you might want to be more professional and branding. And to make a better brand image around the web you must...

As a Website or Business owner you might want to be more professional and branding. And to make a better brand image around the web you must bring professionalism from top to bottom. Email is the main gateway to communicate with visitors and clients. And I think having a professional email is ten times better to have a usual email address.
There are a huge users of Gmail, Yahoo Mail, Outlook mail often regret to own a branded email address. And many people switch to email newsletter service. I won't deny those are good but you have to spend money to use their services. But if you are a owner of custom domain then you don't have to worry about branded email, because after go through this walk through you will be a owner a branded email address by using your existing Gmail.
Question is Why Gmail? Simply answer is there are billions of users are using Gmail everyday in their communication. And Gmail works smooth and fast in load. So I will show you how to convert your Gmail as a branded email at your domain.
For example: your current email address is like below
- jenny@gmail.com
And I'm goanna convert it likes below without spending a single penny.
- jenny@yourdomain.com
Feeling excited!!! Just go through the below tutorials and convert your usual Gmail account into a branded email that end with your domain address.
#1: How to Create Branded email in Email and DNS Configuration?
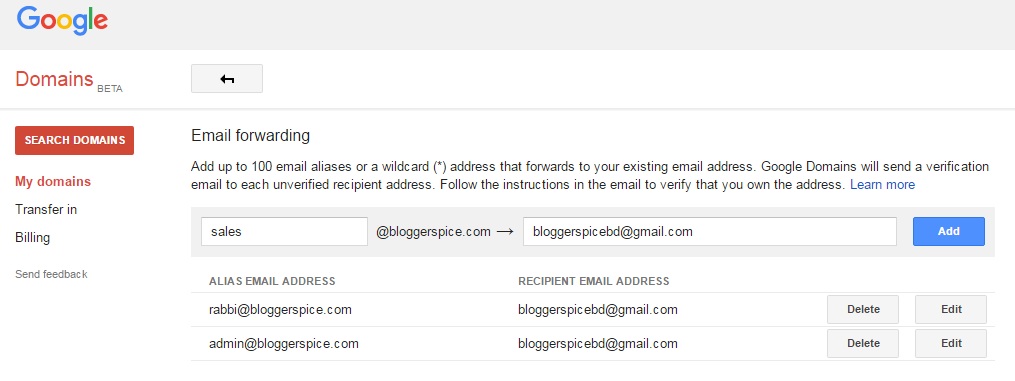
Mainly I will show you how to receive and Forward Email from your Gmail account. So for receiving email you must create email in Email configuration and you have to configure your created email in your DNS (Domain Name Server) configuration. Different domain seller has different name server and settings. I have bought my Domain from Google Domains so I will show you the email configuration of Google Domains under DNS configuration. This is really easy to setup and fortunately Google domains automatically configure domain. You can have a look in below screenshot. This will give a details idea about email configuration.
If you have purchased your domain from Google then you will get the configuration under "DNS Configuration" tab and configure your DNS accordingly and follow the steps from below for Email configuration:
Step #1: Login to your Domain Control Panel and go to "Configure email" tab.
Step #2: Now locate "Email forwarding" and in first blank field write anything that you want to use as Alias email address e.g. your name, info, contact.

Step #3: And in next field write your current Gmail address as recipient email address. After that click on "Add" button that's it instantly your Alias and Recipient email address will be create and add to your email configuration tab.
Now your branded email is ready for receiving email. Now we will setup Gmail for email forward.
#2: How to Configure Gmail for Email Forwarding?
We have already created branded email and configured in DNS to receive email only. Now people can send you email on your branded email. But if you want to send email then you won't able to send email from your branded email. So for sending email from branded email through Gmail we have to setup Gmail. Please follow the below steps for Gmail configuration.
Step #1: Login to your Gmail account that you want to forward messages from
Step #2: In the top right, click Settings (Gear Icon) and Click "Settings" from drop menu.
Step #3: Click the "Forwarding and POP/IMAP"tab. In the "Forwarding" section, click "Add a forwarding address". Enter the email address that you have created under email configuration (Domain Control Panel) to forward messages to e.g. jenny@yourcompany.com. Click "Next"and then Proceed and then "OK".
Step #4: A verification message will be sent to your Gmail account. Click the verification link in that message. Go back to the settings page for the Gmail account you want to forward messages from, and simply refresh your browser.
Step #5: Under "Forwarding and POP/IMAP" tab Select "Forward a copy of incoming mail to".
Choose what you want to happen with the Gmail copy of your emails. I recommend to select "Keep Gmail's copy in the Inbox" option. At the bottom of the page, click "Save Changes".
We have setup the email forwarding. And now we will configure the email sending option.
#3: How to Generate App Password for Email forward?
For forwarding email from your branded email address you must generate a App Password. Now the question is why you need App password? It requires for the following reason:
- To use the Gmail SMTP servers securely, you must set up an App Password.
- To add the alias as an account to your Gmail inbox.
- To set the Gmail SMTP server as the mail server for your forwarded alias, you have generate App Password.
- Overall to convert your Gmail account as Branded email you have to set App Password.
Please go through the procedure to generate App Password:
Step #1: Log into the Gmail account and at the upper right corner in Gmail, click your username or user icon in the to bring up the user menu. And Click "My Account".
Step #2: In the Google account screen, under "Sign-in & security", click "Signing in to Google".
Step #3: In the "Password & sign-in method" box, click "App passwords". You may be asked to re-enter your password at this point.
Note: You must have 2-Step Verification enabled for the App passwords option to be available. If it is not, click 2-Step Verification and enable 2-Step Verification. Then continue to set the App password.

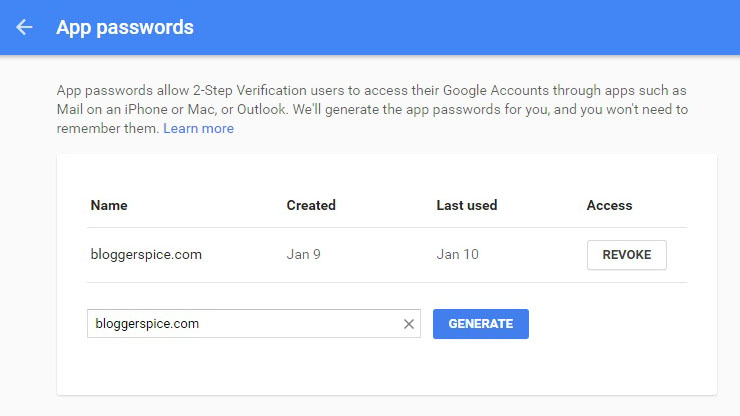
Step #3: In the App passwords box, select "Mail" for the app, select "Other" for the device. And now enter the name of your domain for the “other”device, and click "Generate".

Step #4: Instantly the Generated app password box will display with 16-character password. Just copy this password. You will need it when you add your new send-as (forwarded) account.
Congrats you have generated app password for your email.
#4: How to integrate branded email to your Gmail account?
We have reached to final step. now we will integrate the branded email in Gmail. Please follow the below steps:
Step #1: Return to your Gmail account and from the screen. In the top right corner, click the Settings gear button. Select "Settings" from the drop down menu.
Step #2: from Gmail settings Click the "Accounts and Import"tab. and locate "Send mail as".

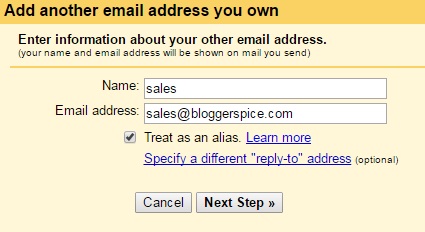
Step #3: Now click "Add another email address"link. In popup windows write your name (such as “Support Team” or “Sales” or any other name for this contact) and email address, make sure you have put tick on "Treat as an alias" option and click "Next Step".

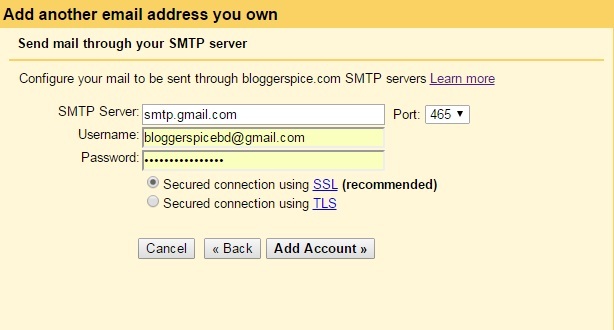
Step #4: In SMTP Server field write smtp.gmail.com, In Port select "465", In username field Your Gmail account (the one you are logged in as) In Password field Type your "App password"that you have generated. And make sure "secure connection (SSL) (recommended) has selected. "Always use a secure connection (SSL) when retrieving mail"
Step #5: Click "Add Account". After you have successfully added the account, a Verification code will send to your Gmail. So return to Gmail. Just check the email and grab the verification code and add the code in the confirmation code.
That's it you have successfully branded your email address. For checking the email just go to compose a email and see that your branded email has appeared with your Gmail address. And now you can send email from your existing Gmail address and Branded email address. To avoid forwarding email selection you can set any email address for default forwarding.
Bonus!Wildcard Email Forwarding
You may little bit excited about Wildcard email forwarding. But this is very useful for Small Business Blog. For example in a Business website we see several email address like
- sales@yourdomain.com
- support@ yourdomain.com
- hello@ yourdomain.com
So this means for every branded email they are using separate email address. In case of small business scenario is different. All emails are receive in a single address. Yes and this is called wildcard email forwarding. You will have multiple email address but all email will forward to a single email like Gmail or Yahoo. You can have a look at below example..
Wildcard represents any address you have not explicitly named. For example, imagine you have set up the following email forwarding:
- sales@yourdomain.com
- support@ yourdomain.com
- hello@ yourdomain.com
You can have a look at below table that people are sending email to your Branded email and ultimately you are receiving your email in your Gmail address. e.g. jenny@gmail.com
| Name | Email To | Forwarding To |
|---|---|---|
| "hello" | hello@yourdomain.com | jenny@gmail.com |
| "support" | support@yourdomain.com | jenny@gmail.com |
| "sales" | sales@yourdomain.com | jenny@gmail.com |
Essentially, using a wildcard gives you an infinite number of email aliases all forwarded to a single address.

To making wildcard email just you have to repeat the whole process that written under #4: How to integrate branded email to your Gmail account? And you can make multiple emails address but you will receive all email into your single Gmail account.

Hope you have created your branded email and let me know how you have created your branded email?


Không có nhận xét nào: